

If you’re encountering an error message that reads “Last Line No Longer Available” when making calls on your iPhone, you’ve come to the right place. In this guide, I will provide you with the necessary information to resolve this issue.
The iPhone has established itself as a leading brand in the smartphone industry, renowned for its superiority and widespread popularity. Due to their sleek design, innovative features, and seamless integration with the iOS ecosystem, these devices have become a status symbol and a benchmark for other smartphone manufacturers.
However, no device is completely immune to occasional errors and troubles. While iPhones generally display fantastic stability, users may encounter rare software glitches, app crashes, or unknown errors. The one we are talking about today is an error that prevents users from making calls on iPhones.
Let’s get into details and try to find causes and solutions to this error.
Last Line Not Available: Understanding the Issue
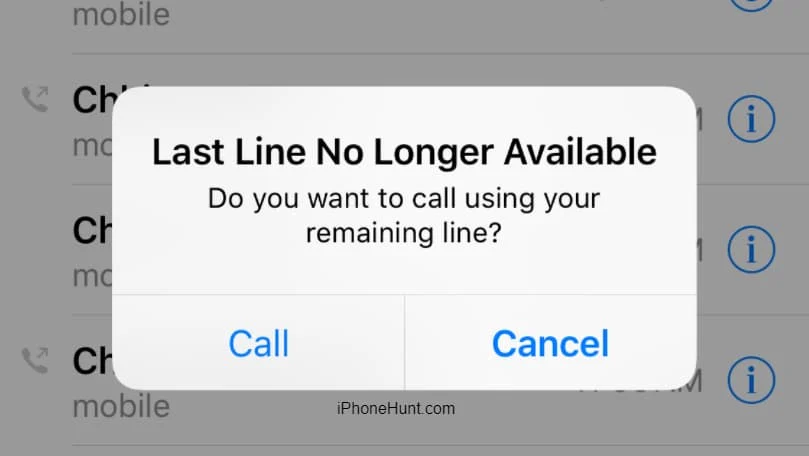
The Last Line No Longer Available is an error message that can occur when attempting to make a phone call on iPhones. This message indicates that the specific line or connection you last used for calling is no longer available or accessible.
Take a look at some of the most common reasons causing this error:
| ISSUE | DESCRIPTION |
| Simultaneous Voice and Data Usage | This error can occur when you try to make a call while simultaneously using data services, such as browsing the internet or apps that require an internet connection. |
| Software Glitch | the Phone app on the iPhone can encounter glitches or bugs that may trigger this error. This can be due to outdated software, apps, conflicts, or other underlying issues. |
| Network connectivity | The error may occur due to a temporary network disruption or a problem with your cellular service provider. |
| Carrier Restrictions | In some cases, the error message can be related to specific carrier restrictions or limitations on your account. |
| Airplane Mode/DND | Enabling Airplane Mode or Do Not Disturb mode frequently can sometimes interfere with the phone’s network connection, leading to the error. |
Usually, when an iPhone is set up with Dual SIM functionality, it can suffer from this error as it faces difficulty identifying the default or preferred line while initiating a phone call. Although Last Line No Longer Available iPhone 13 is very common, it can also affect other iPhone models that support dual SIM functionality, such as the newer iPhone 14.
Troubleshooting the Issue
Now, let’s dive into the main focus of this article: finding a solution to the issue. Below, you will find seven DIY steps that can help you resolve this frustrating error and restore your ability to make calls on your iPhone. Let’s explore these steps in detail:
1. Restart Your iPhone
Let’s begin troubleshooting by restarting your device quickly. Sometimes major issues can be fixed through a quick reboot.
Press and hold the Power button until the power slider appears. Drag the slider to power off your iPhone. After a few seconds, press and hold the Power button again until the Apple logo appears to restart your device. This can help refresh the system and resolve temporary software issues, including the Last line error.
2. Clear Your Call Logs
If the error occurs while dialing a particular number from your contact or call log, it’s a good idea to clear the call history. This may clear the lines to make a call.
- Open the Phone app and go to the Recents tab.
- Tap Edit in the top-right corner and then tap the red minus (-) button next to each call log.
- Confirm the deletion by tapping Delete.
If you encounter the error for every number on your iPhone’s Recents list, try deleting the entire call log. Follow these steps:
- Open the Phone app.
- Switch to the Recents tab.
- Select Edit in the top-right corner and tap on Clear.
- Tap Clear All Recents to delete the call log.
3. Check/Reset Network Settings
It’s a good idea to check your network connectivity as this error may occur due to poor network as well. If you have a proper signal on your phone, the issue may be related to the network settings. Here is how you can reset the network settings to the default.
- Go to Settings ➡ General ➡ Reset ➡ Reset Network Settings on your iPhone.
- Confirm the action and enter your passcode if prompted.
This step will reset your network settings, including Wi-Fi, Bluetooth, and cellular data, which can help clear the line and fix the calling issue on your iPhone.
4. Turn On/Off Airplane Mode
Enabling and disabling Airplane Mode is a quick fix for most iPhone cellular connectivity issues and can solve the Last line issue. Take the following steps:
- Open the Control Center by swiping down from the top-right corner (or up from the bottom on older models)
- Tap the Airplane Mode icon to enable it.
- Wait a few seconds, then tap it again to disable it.
This will help reset your device’s network connections. Try to make a call and verify if the problem has been resolved.
5. Switch Phone Lines
If you have multiple phone lines set up, you can also switch phone lines manually to get rid of the error message. Take the following steps to do so:
- Launch the Phone app and tap the Keypad tab.
- Look for the drop-down menu indicating the current line and select the desired phone line from the list.
Switching lines can help ensure the active line is properly detected, reducing the chance of the Last Line No Longer Available error.
6. Disable Automatic Network Selection
Automatic Network Selection is designed to automatically choose the optimal network for establishing a cellular connection. However, in certain cases, such as iPhones with dual-SIM setups, it can lead to issues. If you consistently encounter the Last Line No Longer Available error message in a specific location, disabling Automatic Network Selection might be helpful. Follow these steps to disable it:
- Launch the Settings app on your iPhone.
- Tap on Cellular from the list of options.
- Select Network Selection within the Cellular settings menu.
- Toggle off the switch next to Automatic Network Selection.
- Next, choose your carrier network from the available options.
7. Update Your iPhone
Still unable to make the call? It’s possible that a pending software update is causing the issue. Here is how you can check/download an iOS update:
Go to Settings ➡ General ➡ Software Update. If an update is available, follow the on-screen instructions to download and install it.
After the update is finished, Once the update is completed, allow your device to restart. Afterward, attempt to make a phone call to verify if the issue has been resolved successfully.
Final Word
The Last Line No Longer Available error can be frustrating, particularly when making important calls. However, by implementing the steps outlined in this guide, you can swiftly regain the ability to make calls in just a few minutes. Key solutions include toggling the airplane mode on and off, as well as disabling automatic network selection.
If none of the aforementioned methods prove successful, it is advisable to seek assistance from Apple support or visit the nearest Apple care center for further guidance and resolution.